· Sunday Crochet
In this pattern
01 · A soft little panda02 · Yarn & tools03 · US terms and abbreviations04 · The pattern05 · Assembly and face details06 · Gauge, size, and finishing notes07 · Common questionsA soft little panda
This seated panda is made from separate ears, arms, legs, and tail, plus an oval head and a compact body. The gray eye patches are crocheted into the head with color changes, while the safety eyes, sculpted cheeks, and embroidered mouth give the face its expression. The sample is about 8 inches tall, worked in plush chenille yarn with a 3.5 mm hook.
I’ll show you how I do this from the first ear to the final head seam. The written pattern uses US crochet terms and gives a stitch total for every round. A measurable gauge and formal skill label are not supplied, so I’ll call this intermediate as an editorial estimate: expect color changes in plush yarn, several small joins, sewing, and needle sculpting.
Yarn & tools
The original yarn amount for the whole toy is about 60–70 g, though a substitute may use a little more or less. Choose a hook no larger than 3.5 mm, and check that the fabric has no visible gaps. Plush yarn hides the stitch tops, so a marker and careful counting are especially helpful. If you want a refresher on the basic hand motions before beginning, the crochet fundamentals lesson covers the foundation skills used here.
US terms and abbreviations
This pattern uses US terminology. MR means magic ring; ch means chain; sl st means slip stitch; sc means single crochet; inc means work 2 sc into one stitch; and dec means crochet 2 stitches together. A repeat such as (1 sc, inc) × 6 means work the bracketed sequence six times. The number in parentheses at the end of each round is the total stitch count after that round. Work the head and body in continuous rounds, marking the first stitch so you can find each round’s beginning.
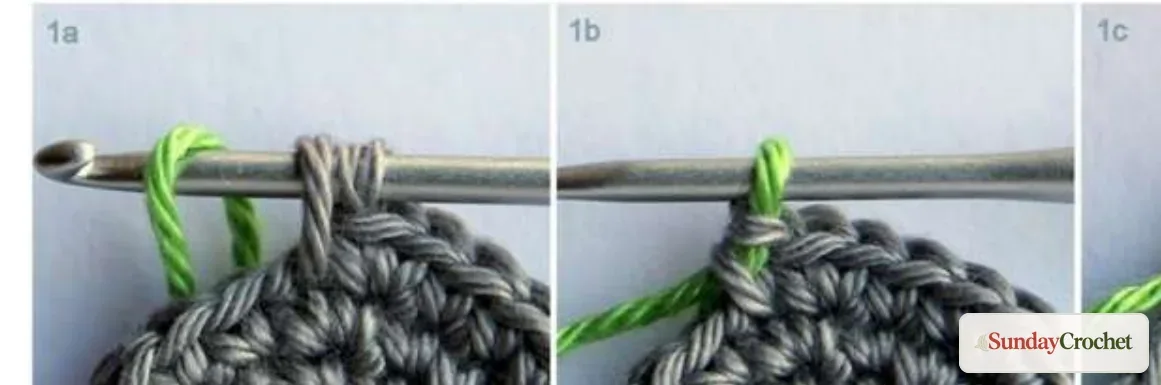
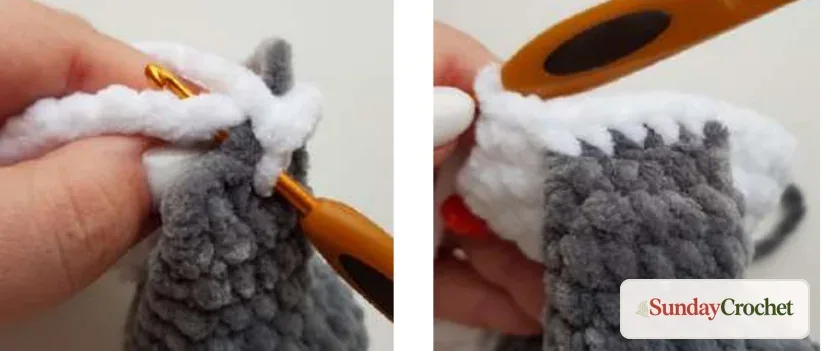
For a color change, follow the three close-up stages in the photo: work the last stitch in the old shade until two loops remain on the hook, then use the new shade for the final yarn-over and pull-through. Keep the change neat at the back of the head. Rounds 5 and 6 form the two gray eye patches against the white face.
The pattern
Ears, make 2
Use dark gray yarn for both ears.
Round 1: Work 6 sc into a magic ring, or ch 2 and work 6 sc into the second chain from the hook. (6)
Round 2: Inc in each stitch around. (12)
Round 3: Sc in each stitch around. (12)
Fold the ear flat and work 6 sc through both layers to close the edge. Fasten off, leaving a tail for sewing only if you plan to attach the ear separately. The ears can also be joined directly to the head in Round 12.
Head
Begin with white yarn. The head starts as an oval worked around both sides of a short chain.
Round 1: Ch 5. Starting in the second chain from the hook, work an inc, 2 sc, and 3 sc in the last chain. Turn along the opposite side of the foundation chain and work 3 sc. (10)
Round 2: Work 2 inc, 2 sc, 3 inc, 2 sc, and 1 inc. (16)
Round 3: Sc in each stitch around. (16)
Round 4: Sl st in each stitch around. (16)
Round 5: Work in back loops only and change colors for the eye patches: with white, work 1 sc and 1 inc; with dark gray, work 3 inc; with white, work 2 inc; with dark gray, work 3 inc; with white, work 1 inc and 5 sc. (26)
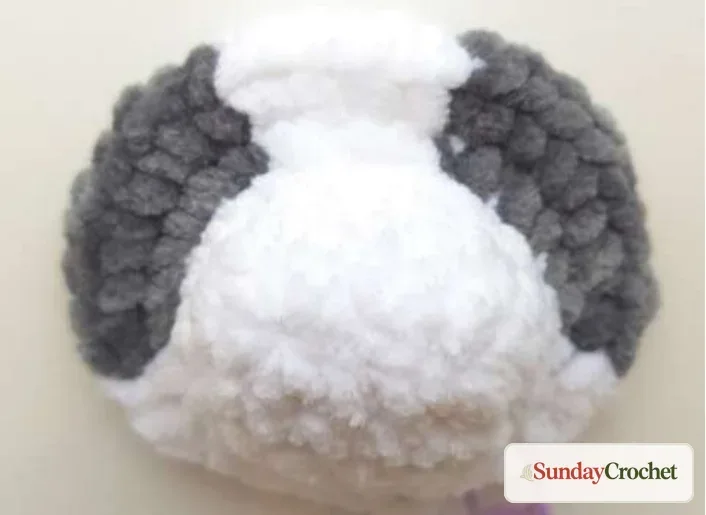
Round 6: With white, work 2 sc and 1 inc; with dark gray, repeat (1 sc, inc) 3 times; with white, repeat (1 sc, inc) 2 times; with dark gray, repeat (1 sc, inc) 3 times; with white, work 1 sc, 1 inc, and 5 sc. (36)
Fasten off the dark gray yarn and continue in white.
Round 7: Work 4 sc, 1 inc, 22 sc, 1 inc, and 8 sc. (38)
Rounds 8–11: Sc in each stitch around for 4 rounds. (38 each round)
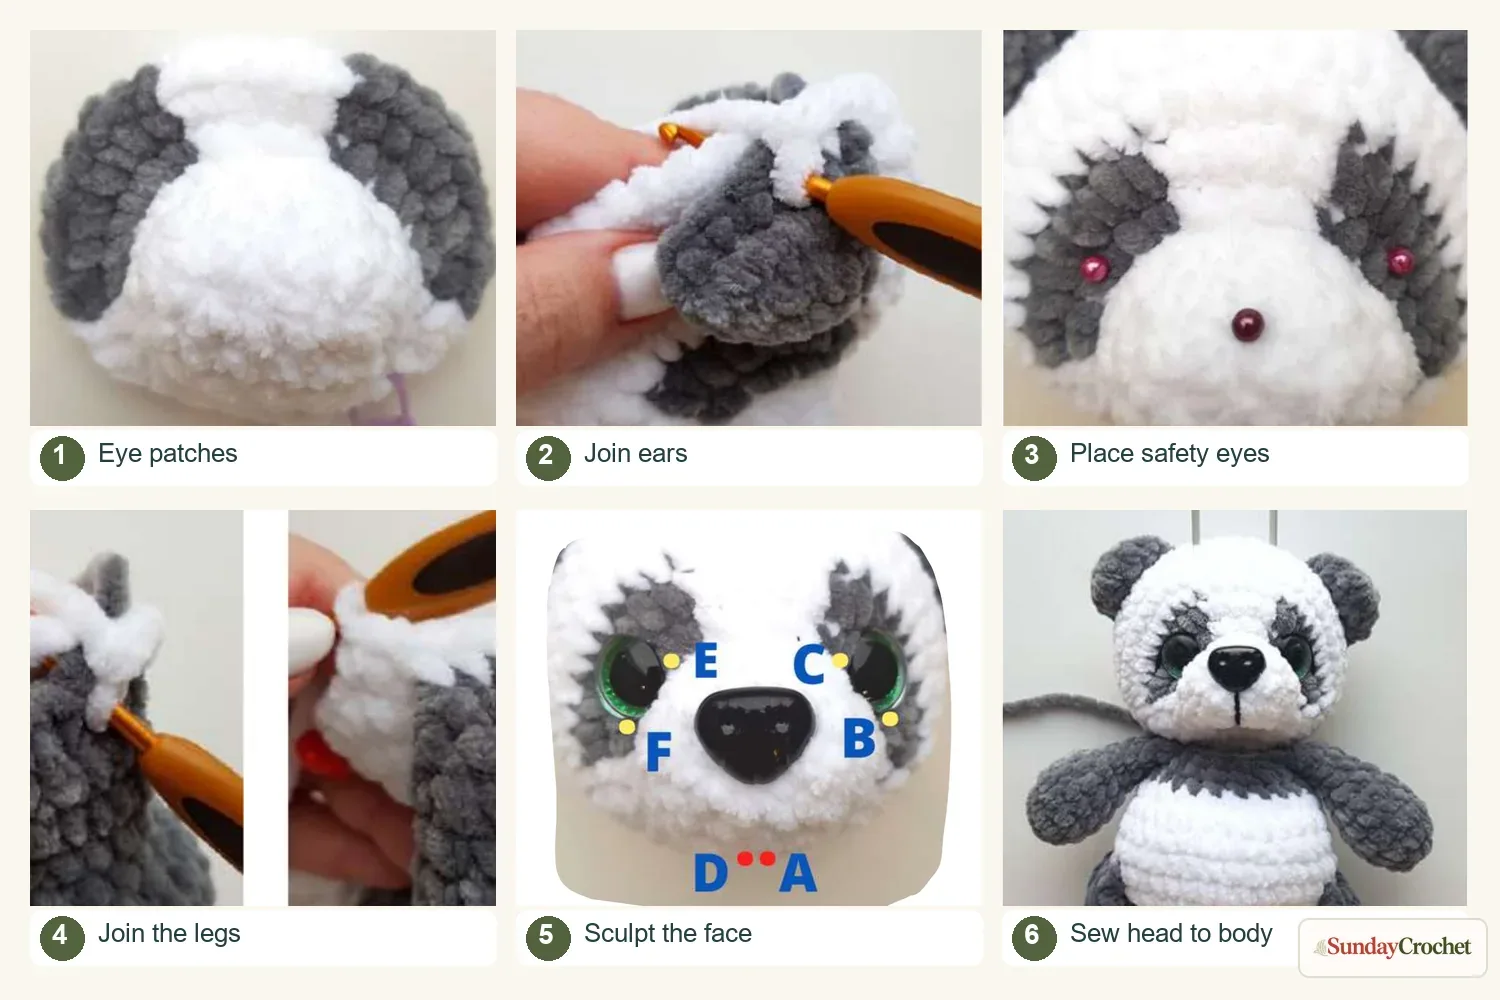
Round 12: Join the ears as you crochet: work 8 sc, 6 sc through the first ear and head edge, 3 sc, 1 dec, 2 sc, 6 sc through the second ear and head edge, 9 sc, and 1 dec. (36)
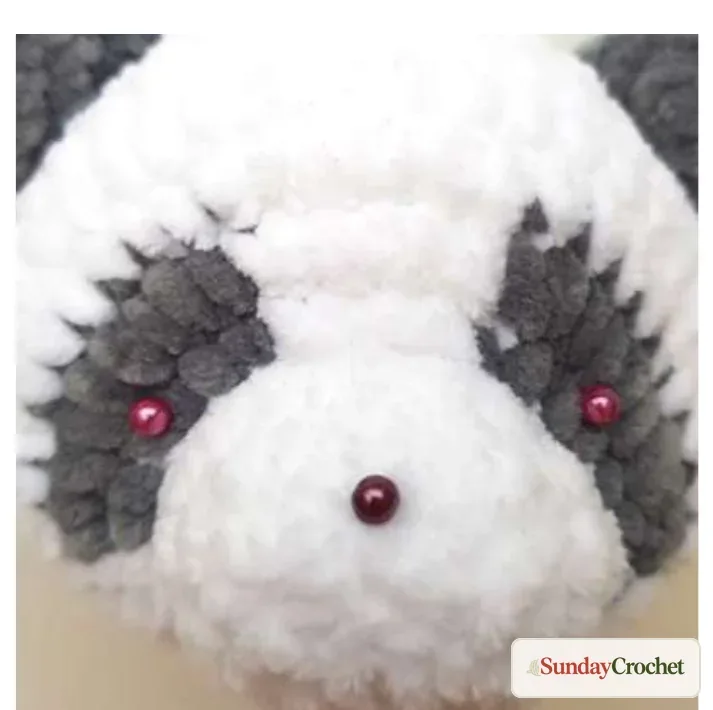
Check that the ears sit evenly in relation to the eye patches and nose. If joining them in the round feels awkward, leave them separate and sew them onto the finished head instead. Place the 16 mm safety eyes through the patches in Round 5, about 10 sc apart when measured between the eye posts. Check the face straight on before securing the washers. Place the safety nose in Round 2, a little above the foundation-chain center, along the border between Rounds 1 and 2.
Round 13: Repeat (4 sc, dec) 6 times. (30)
Round 14: Repeat (3 sc, dec) 6 times. (24)
Round 15: Repeat (2 sc, dec) 6 times. (18)
Begin stuffing the head. Push fiberfill gently into the muzzle so it rounds outward, then fill the cheeks and sides to make the head plump. Leave enough give in the face for the needle sculpting later.
Round 16: Repeat (1 sc, dec) 6 times. Stuff the head completely. (12)
Round 17: Dec 6 times. (6)
Fasten off, thread the tail onto a needle, and close the remaining opening. Keep the stitches small so the crown stays smooth.
Arms, make 2
Use dark gray yarn.
Round 1: Work 6 sc into a magic ring, or ch 2 and work 6 sc into the second chain. (6)
Round 2: Inc in each stitch around. (12)
Rounds 3–5: Sc in each stitch around for 3 rounds. (12 each round)
Round 6: Repeat (1 sc, dec) 4 times. (8)
Lightly stuff only the lower part of each arm. Leave the upper section soft and unstuffed.
Rounds 7–9: Sc in each stitch around for 3 rounds. (8 each round)
Flatten the opening and work 4 sc through both layers. Fasten off. The closing edge is 4 stitches.
Legs, make 2
Use dark gray yarn.
Round 1: Work 6 sc into a magic ring, or ch 2 and work 6 sc into the second chain. (6)
Round 2: Inc in each stitch around. (12)
Round 3: Repeat (1 sc, inc) 6 times. (18)
Round 4: Repeat (inc, 2 sc) 6 times. (24)
Rounds 5–6: Sc in each stitch around for 2 rounds. (24 each round)
Round 7: Work 6 sc, 6 dec, and 6 sc. (18)
Round 8: Work 3 sc, 6 dec, and 3 sc. (12)
Rounds 9–11: Sc in each stitch around for 3 rounds. (12 each round)
Round 12: Repeat (4 sc, dec) 2 times. (10)
Stuff only the lower part of each leg. Work 1 or 2 extra sc if needed to place the closing edge, then flatten the opening and work 5 sc through both layers. The extra stitches help position the seam; the leg still has 10 stitches before closing. Fasten off.
Body
Start with white yarn and work upward from the bottom.
Round 1: Work 6 sc into a magic ring, or ch 2 and work 6 sc into the second chain. (6)
Round 2: Inc in each stitch around. (12)
Round 3: Repeat (1 sc, inc) 6 times. (18)
Round 4: Repeat (inc, 2 sc) 6 times. (24)
Round 5: Repeat (3 sc, inc) 6 times. (30)
Round 6: Work 1 sc, 1 inc, repeat (4 sc, inc) 5 times, then work 3 sc. (36)
Round 7: Join the legs, placing the marker at the back: work 6 sc, 5 sc through the first leg and body edge, 14 sc, 5 sc through the second leg and body edge, then 6 sc. (36)
Round 8: Sc in each stitch around. (36)
Round 9: Repeat (4 sc, dec) 6 times. (30)
Round 10: Sc in each stitch around. (30)
Round 11: Work 10 sc, 6 dec, and 8 sc. (24)
The six decreases in Round 11 should sit evenly in relation to the legs to shape the rounded tummy. If the decrease section has drifted to one side, adjust its position while keeping the same total count.
Fasten off the white yarn and continue with dark gray.
Round 12: Sc in each stitch around. (24)
Round 13: Repeat (2 sc, dec) 6 times. (18)
Round 14: Join the arms: work 4 sc, 4 sc through the first arm and body edge, 5 sc, 4 sc through the second arm and body edge, then 1 sc. (18)
Check that the arms line up evenly with the legs. Work 1 sl st, fasten off with a long sewing tail, and stuff the body.
Tail
Use dark gray yarn.
Round 1: Work 6 sc into a magic ring, or ch 2 and work 6 sc into the second chain. (6)
Round 2: Inc in each stitch around. (12)
Round 3: Sc in each stitch around. (12)
Round 4: Dec 6 times. (6)
Work 1 sl st and fasten off with a long tail. Add a small amount of fiberfill so the tail keeps its round shape.
Assembly and face details
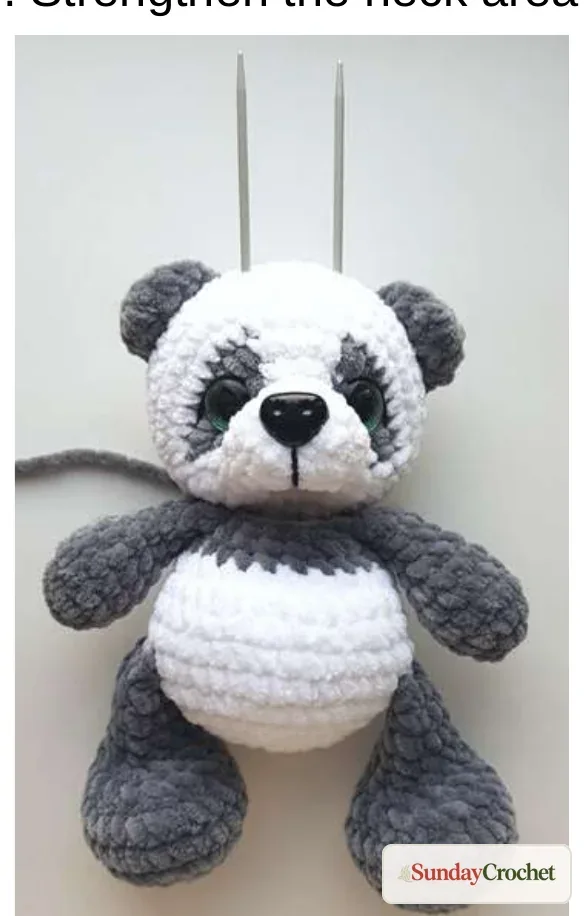
Pin the ears in place if you made them separately. Before sewing, look at the head from the front and check the distance from each ear to the corresponding eye patch. Use the two long needles to hold the head upright on the body and keep the neck line close to the point where the muzzle was tightened. Sew around the neck with the long body yarn tail or strong thread. Add a little fiberfill at the neck as you sew to support the head, then secure and hide the ends.
For the cheeks, thread a long needle with nylon or another strong thread. Follow the A-to-F route in the diagram: enter at A on Round 4 and come out at B beside one eye; go in at C beside the other eye and come out at D, one stitch from B; return through A and exit at E beside the opposite eye; go in at F next to that eye and return to A. Pull both ends while pressing the eyes and muzzle gently with your fingers. Tighten gradually until the cheeks stand out, then tie a couple of knots and bury them inside the head. The before-and-after photo shows how this changes the expression.
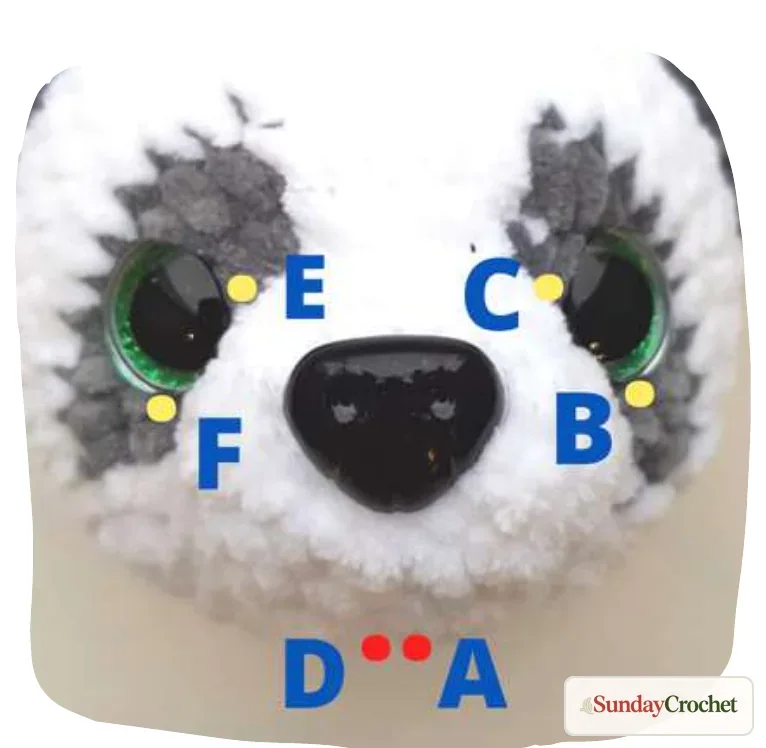
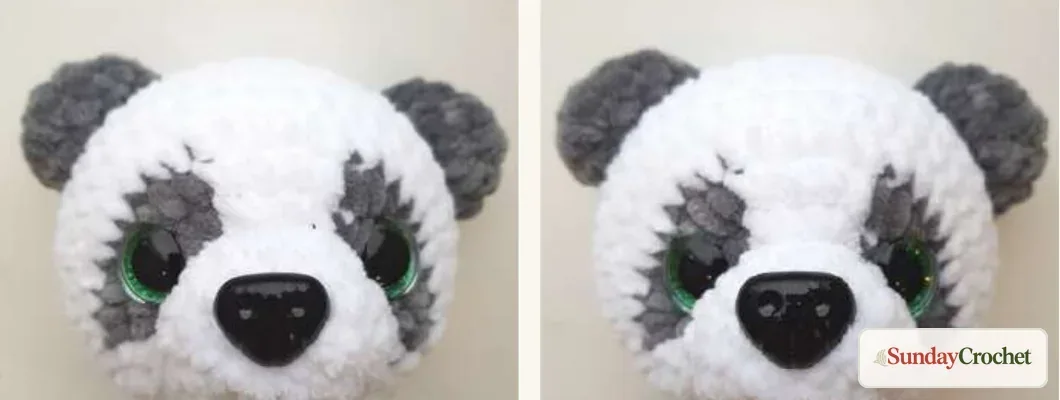
Use black 4-ply yarn to embroider the eyelids and mouth with a suitable needle. The safety nose sits above the foundation center, and the embroidered mouth continues down from it. Finish by sewing the tail to the back of the body at the level of Body Rounds 5–6.
Gauge, size, and finishing notes
No stitch or round measurement is provided, so there is no numerical gauge to match. The sample height is about 20 cm, or 8 inches, and will change with yarn, hook, and personal tension. The useful fit check is fabric density: use a hook no larger than 3.5 mm and keep the stitches tight enough that stuffing cannot show through. If your stitches look open, try a smaller hook before you begin the pieces.
Stuff the head and body firmly enough to hold their shape, but do not stretch the plush fabric. The arms and legs are intentionally stuffed only at their lower ends, and the ears are not stuffed. Lightly singeing plush yarn ends can reduce fraying. This uses an open flame, so keep the flame away from the toy, loose fibers, and other materials; if you are not comfortable with that method, secure and weave the ends carefully with a needle instead.
Common questions
Can I sew the ears on instead of joining them in the round?
Yes. The ears may be left separate and sewn onto the completed head. Pin them first and compare their positions against the eyes and nose from the front.
Why does my panda look different in size?
The sample is about 8 inches tall, but the yarn, hook, stitch tension, and crochet style all affect the finished size. The pattern gives no fixed stitch gauge, so use the stated height as a reference rather than a guarantee.
When should I add the safety eyes?
Place the 16 mm eyes in Head Round 5, about 10 single crochets apart when measured between the posts. Check symmetry before pressing on the washers, while the back of the head is still accessible.
How much stuffing should I use?
The head and body should feel firm and rounded. Keep the arms and legs mostly soft, stuffing only their lower parts as directed, and give the tail just enough filling to keep its shape.